Creating a logo for embroidery is very different from designing a logo for digital use. Embroidery requires precision, simplicity, and proper formatting to ensure the design looks clean and professional when stitched onto fabric. Whether you run a clothing brand, uniform business, or promotional company, having a well-optimized embroidery logo can elevate your brand identity.
In this guide, we’ll explain how to design, prepare, and digitize logo for embroidery so it delivers the best results.
Why Embroidery Logo Design Matters
Unlike printed logos, embroidery uses threads, which means every detail must be carefully planned. A poorly designed logo can lose clarity, look messy, or even become unreadable when stitched.
A strong embroidery logo helps you:
- Build a professional brand image
- Maintain consistency across uniforms and products
- Increase brand recognition
- Deliver a premium look and feel
Key Elements of a Perfect Logo for Embroidery
When designing a logo for embroidery, simplicity is the key. Complex designs may look great on screen but often fail during stitching.
Important Factors to Consider:
- Minimal Details: Fine lines and tiny text may not stitch properly
- Bold Fonts: Clear and thick lettering works best
- Limited Colors: Fewer thread colors improve clarity and reduce cost
- Clean Shapes: Simple shapes produce better stitching results
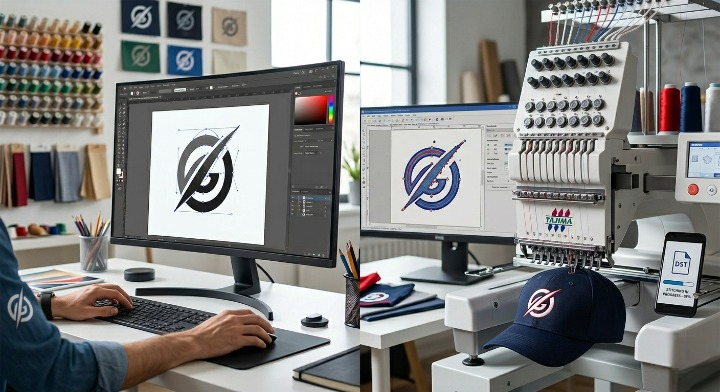
How Logo Digitizing Works for Embroidery Designs?
To digitize logo for embroidery, you convert your design into a stitch file that embroidery machines can read. This process defines stitch types, directions, and thread colors.
Without proper digitization:
- The logo may distort
- Threads may overlap incorrectly
- Final output may look unprofessional
Digitization is not just conversion—it’s a technical process that ensures your logo stitches perfectly on fabric.
File Formats for Embroidery Logos
Here’s a quick comparison of common file formats used in embroidery:
| Format | Use | Editable | Best For |
| JPG/PNG | Basic image | No | Preview only |
| SVG/AI | Vector design | Yes | Logo creation |
| DST/PES | Stitch file | No | Embroidery machines |
| Sharing design | Limited | Client approval |
Steps to Create an Embroidery-Ready Logo
1. Start with a Simple Design
Avoid gradients, shadows, or overly detailed graphics. Keep the design clean and bold.
2. Choose the Right Colors
Stick to 2–4 colors for best results. Using too many colors can raise production costs and make the stitching process more complicated.
3. Optimize Text
Use readable fonts with enough spacing. Small text may not stitch clearly.
4. Digitize the Logo
Convert the design into a stitch file using professional software or services.
5. Test the Output
Always test the embroidery on fabric before final production.
Pros and Cons of Embroidery Logos
Pros
- Long-lasting and durable
- Premium and professional appearance
- Ideal for uniforms and branding
- Resistant to fading
Cons
- Limited detail compared to print
- Higher production cost
- Requires digitization
- Not suitable for very complex designs
Common Mistakes to Avoid
Many businesses make simple mistakes that affect final results:
- Using thin lines that disappear during stitching
- Adding too many colors
- Skipping the digitization process
- Ignoring fabric type (different fabrics affect stitching quality)
Avoiding these mistakes ensures your logo looks sharp and professional.
Tips for Better Embroidery Results
- Use vector files for best quality
- Work with experienced digitizers
- Keep logo size appropriate for placement
- Test on different fabrics like cotton, polyester, or denim
Conclusion
A well-designed logo for embroidery can significantly enhance your brand’s image. The key lies in simplicity, proper planning, and professional digitization. When you digitize logo for embroidery correctly, you ensure that every stitch reflects quality and precision.
Investing time in the right design approach will save you money, improve results, and create a strong visual identity that lasts.